Helicon Ape product offers a bunch of unique features to shAPE up your IIS7-based web server, and one of the most exciting things about it is that you don’t even need a dedicated server to install it! If your hosting provider supplies shared accounts with IIS7 support, you can install Helicon Ape on your web site without having to bother the server administrator.
Here are the steps to accomplish this:
- Find a hosting with IIS7 on it.
- Download Helicon Ape to your local machine. Not to the hosting!
- Install it locally specifying «Manual package» in the Installation type dialog.

- Open Helicon Ape installation folder (e.g. “C:\Program Files\Helicon\Ape\ManualInstall”).
- Open target site via FTP and go to
wwwrootfolder.
- Copy all content of ManualInstall folder into
wwwroot(preserving folder structure). “All” includes:
– Bin\Helicon.Ape.dll – the module itself;
– Helicon\httpd.conf – server configuration file;
– .htaccess – distributed config example;
– example_web.config – Helicon Ape registration for the site;
If there’s noweb.configin the root of the site, renameexample_web.configintoweb.config. Ifweb.configis already there, add the following lines into <system.webServer> section:<?xml version="1.0" encoding="UTF-8"?> <configuration> ... <system.webServer> ... <modules> <add name="Helicon.Ape" type="Helicon.Ape.ApeModule" /> </modules> <handlers> <add name="Helicon.Ape Handler" path="*.apehandler" verb="*" type="Helicon.Ape.Handler" resourceType="Unspecified" preCondition="integratedMode" /> </handlers> ... </system.webServer> ... </configuration> - Open wwwroot\.htaccess and put the following lines at the bottom to check operability:
-
RewriteEngine On RewriteRule . – [G] - Make any request to your site and you are likely to get the following result

Which means that Helicon Ape is working!


Possible issues
“But it isn’t actually working!” you exclaim indignantly.
This may be due to several possible reasons:
- Firstly, let’s have a glance at wwwroot\Helicon\error.log.

- In our case the hosting has restricted permissions in a way that doesn’t allow Ape to use its trial protection, so it is necessary to enter the registration data. Ask for trial keys on [email protected], add the following lines at the top of wwwroot\Helicon\httpd.conf and save changes:
RegistrationName= Name
RegistrationCode= XXXXX-XXXXX-XXXXX-XXXXX
- There may also be issues with your distributed configuration. .htaccess files may be used by other applications (such as ISAPI_Rewrite, IISPassword, etc) and it’s not that handy to create them in Windows Explorer. Luckily you are empowered to change the default config name using AccessFileName directive in the httpd.conf file:
AccessFileName Ape.ini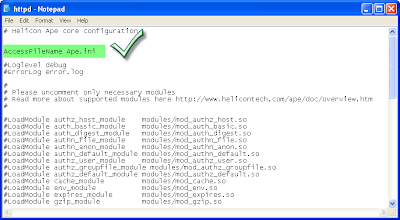
- Sometimes hosting configures the site to work in Classic pipeline mode. Ape can work in such environment (see how to configure wildcard mapping) but it’s better to ask your hosting to switch the pool to Integrated mode if possible.
- It may happen that hosting has set too low .Net Trust Level for the site. This may affect Helicon Ape operation.

Full down to Medium level is sufficient for Ape to work a treat. Lower level may cause substantial limitations.


Resume
As you see configuring Helicon Ape on shared hosting is piece of cake! And no administrator help is needed. You can do everything by yourself in a matter of minutes.
Hope this feature will be of use to you.
Good luck and best wishes,
Helicon Tech Team